Posts

How to Make an Origami Beach Umbrella (With NO scissors, glue, OR tape)

Image
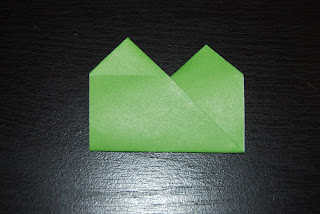
     I've been wanting to post something summer-themed, because I am in the middle of summer myself. One of the first things that came into my head to do was a beach umbrella. When searching online, the only origami beach umbrellas that I could find used tape, scissors, and/or glue! Personally, I believe that paper should be the only supply used in origami.       So, I adapted what I found online, to use paper and nothing else.  Just folding, no cutting and no taping. And that it what you will find in this post. And FYI: You will need 2 pieces of paper for this. If you want the pole to be shorter than mine was, used a smaller piece of paper than the top.       If you are confused on a fold, just go to my page on folds .        Lets begin: Step 1: Begin by making a Waterbomb Base with one of your papers. (This will become the top of your umbrella.) Set the other paper aside for later.    Step 2: Take the top flap on the right side and perform a

Some changes happening to Epic Origami....

      OKAY. So maybe, it you've looked into this blog before, you know that this used to be my brother's and I took over for him. And it was going good, until I stopped posting. My last post was like a year and a half ago. (GULP!) I just plain forgot about it.       Anyway, this post is to say, I'm done doing nothing! I am going to do my best to get posting again and give you quality origami instructions.      And I'd like to start off with a good note and make this blog even better. So I have a few questions for you. And if you have good input, please comment below your opinion. What type of origami instructions do you want? Animals? Moneygami? Flowers? Something practical? Would you find patterned origami distracting in my tutorials? What background do you think is best? Plain white? Plain color? Black or regular wood designs?      Thanks for reading this post and the the rest of my blog. I really appreciate it. Please tell me anything else I can do to

Epic Origami's 6th Year Anniversary!

Image
     This blog, Epic Origami has been around for 6 years now!  Its first post was April 24th, 2013. At that point, it was started by my older brother, Dallin. I know its been over two months more that 6 years, but I'm still doing this post.       Dallin started this off t o provide clear, reliable instructions for a variety of origami models. Sometimes, origami books or online instructions are too vague or unclear and he wanted to be a part of the solution. Over a period of multiple years, he posted 75 posts to this blog! That's a lot, especially given how much time and effort is put into each post.       Then, about two and a half years ago, my brother got a bit bored of this, and so I took over for him. I wasn't nearly as experienced as him, but I've tried my best. I also forgot about this for a while, but I hope to be posting more as the summer goes on.        I'd just like to attach a few pictures that represent Epic Origami at its finest. Feel free to cli

How To Make Origami Grass (Variation)

Image
I like this origami grass variation because it is so simple and because I designed it myself. I also like how the blades are even, and look like they were just cut by a lawn mower. Step 1: Take your piece of paper and place it face down. Step 2: Take the right side and fold it across the left. Then fold the top to the bottom. Then unfold you last fold. Step 3: Fold the top of the paper to the center line. Do the same with the bottom, and unfold both folds. Step 4: Take the top-right corner and fold it along the first line it meets. Do the same with the bottom-left corner. Step 5: Take the top-left corner and fold it along the center line. Repeat with the bottom-right corner. Step 6: Take the bottom and fold up along the center line. And you finished your origami grass variation!

How To Make an Origami Card Holder

Image
The Card Holder is an easy way to hold all of your cards. Step 1:  With your paper face down, valley fold across and unfold. Step 2: Valley fold down and unfold. Step 3: Take the left side and fold to the center line. Step 4: Repeat step 3 on the right side and unfold. Step 5: Take the top right corner and fold it along the first crease. Step 6: Repeat step 5 on the bottom right corner. Step 7: Fold the sides back to the center and flip your paper over. Step 8: Take the top and valley fold down to the middle crease. Step 9: Repeat step 8 on the bottom. Step 10: Fold your paper in half along the crease. Step 11: Unfold and rotate to put your cards in your card holder.