Posts

Showing posts from July, 2013

Origami Butterfly

Image
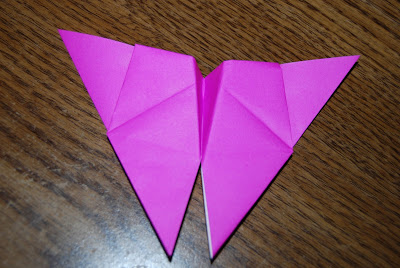
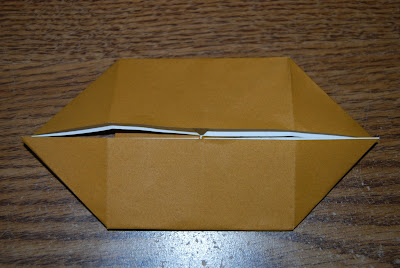
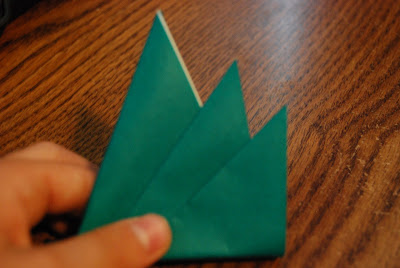
The butterfly is a traditional origami model and is also very elegant. They look great when made from vibrant colors or even patterned paper, just like real butterflies. Step 1: Fold a  boat base Step 2: Valley fold the left and right tips of the top portion up Step 3: Mountain fold those top tips down and around the back of the model so they are at the bottom of the model Step 4: Mountain fold the left tip so it goes behind the right one Step 5: Valley fold the top portion over, using the points that my middle and index finger are touching as an axis  It will look like this: Step 6: Mountain fold the far right point around the back at the same angle Step 7: Unfold the wings so they look like a butterfly, and you are done!

The Helmet Base

Image
The helmet base is a very easy origami base that requires only a few steps to make it. It is most commonly used to make a Samurai hat  (or helmet). Step 1: Place your paper color side down and orient it diagonally Step 2: Valley fold the top corner to the bottom and crease Step 3: Valley fold the far left corner to the bottom point Step 4: Valley fold the far right corner to the same spot Your helmet base is now complete!  Model(s) requiring helmet base: Samurai Hat

The Boat Base

Image
The boat base is a less common, but still important, origami base. It is rather simple, and can be used to fold a variety of origami models. It is also used to help make the  pinwheel base . Step 1: Start with your piece of paper color side down Step 2: Crease the paper by valley folding the paper in half horizontally and vertically Step 3: Crease the diagonals  Step 4: Valley fold the right and left edges to the center Step 5: Valley fold the top and bottom edges to the center Step 6: Partially unfold the top flap Step 7: Valley fold the point at my index finger to the point at my thumb... ... like this: Step 8: Do the same on the other side and squash fold the flap flat  It should look like this: Step 9: Rotate the model 180 degrees Step 10: Repeat steps 6-9 on the new top part to complete your boat base! Models requiring Boat base: The Butterfly The Pinwheel Base Note: There are

Origami How-to: Traditional Grass

Image
This latest grass model is almost as easy as the other two models of regular   grass and its variation  on this blog. It works great as scenery, and it will also stand up on its own.  Step 1: Start with your paper color side down Step 2: Valley fold the bottom right corner to the top left one Step 3: Valley fold the bottom corner of the triangle to the far right one Step 4: Take the first flap on the right side and valley fold it over about two-thirds of the way Step 5: Valley fold the right point about one-third of the way up Step 6: Rotate the model so it looks like this: Step 7: To make it stand mountain fold part of the bottom edge behind the model Your grass is now complete! Wasn't that easy?

The Hopping Frog

Image
The hopping frog is an easy model to fold, and is very rewarding in the end. The frog will imitate its real-life cousins and actually hop with the press of a finger. Step 1: Fold a  waterbomb base Step 2: Valley fold the bottom left corner to the top Step 3: Valley fold the bottom right corner to the top Step 4: Valley fold the bottom two edges of the square to the center Step 5: Valley fold the edges that meet in the center out. This completes the front legs of your frog. Now for the back legs: Step 6: Turn the model over so the top becomes the bottom Step 7: Fold both the bottom right and left edges of the triangle to the center Step 8: Valley fold the edges that meet in the center out to form the back legs Step 9: Rotate the model 180 degrees Step 10: Turn the model over (sorry about the sideways pic) Step 11: Valley fold the back legs up so they are about even with the head in the center